GeoGebra Tutorial 31 – Paper Folding Simulation
This is the 31st GeoGebra Tutorial of the GeoGebra Intermediate Tutorial Series. If this is your first time to use GeoGebra, you might want to read the GeoGebra Essentials Series.
In this tutorial, we are going to use GeoGebra to simulate paper folding. We will represent a rectangular piece of paper with corners ABCD and drag the upper right corner (vertex B) anywhere inside the rectangle.
We will use a Point on Object, a which is only available in GeoGebra 4.0 Beta Release, which can be downloaded here. As an alternative, the Point in region tool can be replaced by the New point tool as an alternative in lower versions (see details in the step-by-step instructions).
If you want to follow this tutorial step-by-step, you can open the GeoGebra window in your browser by clicking here. You can view the output of this tutorial here.
| 1. Open GeoGebra and select the Algebra & Graphics view from the Perspectives menu. | |
| 2. To show labels of new created points, click the Options menu, select Labeling, and then click New Points Only. | |
| 3. Type A = (0,4) in the Input bar and then press the ENTER key to construct point A on (0,4). Construct the three more points: B = (6,4), C=(6,0) and D = (0,0). | |
|
|
4. Now, we fix the location of the points to avoid it being accidentally moved. To fix point A, right click on it and click Object Properties to display the Preferences window. |
| 5. In the Preferences window, select the Basic tab, and check the Fix Object check box. Now, fix the location of the other three points. | |
| 6. Now, using the Polygon tool, construct polygon ABCD. In using the Polygon tool, click the points in the following order: A, B, C and D, then A. |
|
| 7. Now, select the Point on Object tool, and click the interior of the polygon This will create point E. | |
|
|
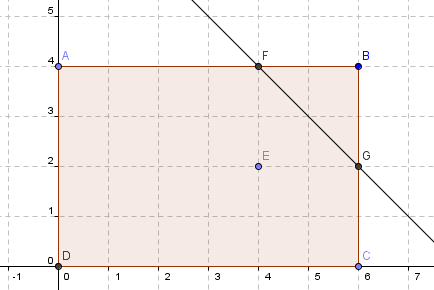
8. Display the grid and drag point E to (4,2). If we fold the right corner of the rectangle, where point B will coincide to E, the crease that will be formed will be the perpendicular bisector of BE. |
| 9. To construct the perpendicular bisector, select the Perpendicular Bisector tool, click point B and then click point E. | |
10. Using the Intersect Two Objects tool, intersect AB and the perpendicular bisector. Also, intersect the BC and the perpendicular bisector. This will construct point F and G respectively. Your drawing should look like the one shown in Figure 1.
 Figure 1 |
|
|
|
11. Hide the Axes, drag point E to (5,0) and then intersect the line with AD to construct point H. Drag point E to (1,3) and then Intersect the perpendicular bisector and CD (segment c in the algebra view). This will form point I. |
|
|
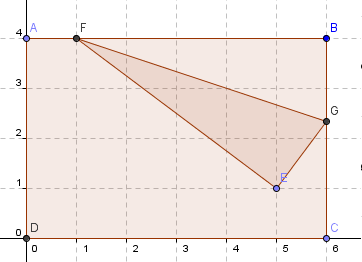
12. Show the axes, hide the perpendicular bisector, and drag point E to (5,1). Use the Polygon tool to construct triangle FEG. Your drawing should look like the one shown in Figure 2.
 Figure 2 |
|
|
13. Again, drag point E to (5,0). Notice that the triangle disappeared. This is because point F, which is the intersection of the perpendicular line and AB, does not exist. |
| 15. Next, we draw the corner of the folded paper with vertex E. To do this, construct a line perpendicular to GE and passing through E. | |
| 16. Also, to draw the other vertex, we construct a line parallel to GE and passing through H (can you see why we did this?). | |
|
|
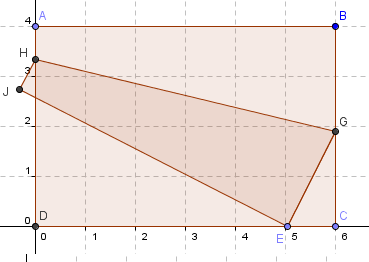
17. Now, we intersect the two new lines forming point J as shown in Figure 3. |
|
|
18. Hide the two lines and use the Polygon tool to construct polygon EGHJ.
 Figure 3 |
|
|
19. We are almost done. Now drag point E to on (1,3). We will do the same method. Construct a line perpendicular to EF and passing through E. |
| 20. Next, construct a line parallel to EF and passing through I. | |
|
|
21. We now intersect the two lines which will construct point K. |
|
|
22. Hide the two lines and construct quadrilateral EFIK. Your drawing should look like the diagram shown in Figure 4.
 Figure 4
|
|
|
23. Now drag point E anywhere inside the rectangle. What do you observe? Is the simulation correct? Explain your answer. |