GeoGebra Tutorial 27 – Animation and Epicycle
This is the 27th tutorial of the GeoGebra Intermediate Tutorial Series. If this is your first time to use GeoGebra, you might want to read the GeoGebra Essentials Series.
In this tutorial, we rotate a circle about the center of another circle tangent to it using the animation feature of GeoGebra. Along the rotating circle, we will also rotate a point on its circumference about its center (see red point in the diagram). The path of this point is called the epicycloid.

If you want to follow this tutorial step-by-step, you can open the GeoGebra window in your browser by clicking here. You can view the output of this tutorial here.
Instructions
| 1. Open GeoGebra and select Algebra & Graphics from the Perspectives menu. | |
| 2. To automatically label the new points and not label the other objects, from the menu bar, click Option>Labeling>New Points Only. | |
| 3.First, we construct the center of the unit circle. Select the Intersect Two Objects tool, click the x-axis and click the y-axis. This will produce point A on the origin. | |
| 4. To construct a circle with center A and radius 1, type circle[A,1], then press the ENTER key. | |
| 5,Next, to construct point B on (1,0).To do this, type B = (1,0) in the Input bar, then press the ENTER key. | |
| 6. Next, we construct an angle slider that will rotate point B about A. To do this, select the Slider tool, then click a vacant space on the Graphics view to display the Slider dialog box. | |
7. In the Slider dialog box, select the Angle button, and type a as the angle name, leave the default value of the interval tab as shown in Figure 1, and click the Apply button.
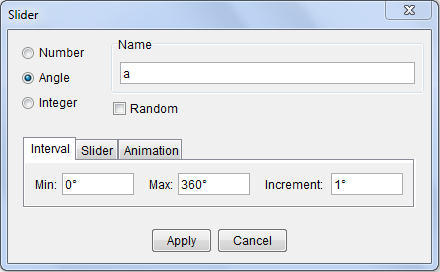 Figure 1 |
|
|
|
8. Next, we rotate point B about A, a degrees counterclockwise. To do this, select Rotate Object around Point by Angle, select point B, select point A to display the Rotate Object around Point by Angle dialog box. |
| 9. In the Rotate Object around Point by Angle dialog box, replace the measure angle with a in the Angle name text box, select counter clockwise button, then click the OK button. This will produce B’. | |
| 10. Move the slider. When moving slider a, B’ should move along the circle counter clockwise. | |
11. Next, we construct a ray through AB’. To do this, select Ray through Two Points, click point A and click point B’.
 Figure 2 |
|
| 12. Next, we construct a unit circle tangent to the circle with B’ as point of tangency. But first, we must find the center of the tangent circle which is on ray AB. To do this, select the Compass tool, click point A and click point B, then click point B’. | |
13. Next, we intersect the ray and the circle with center B’. To do this, select the Intersect Two Objects tool and click the intersection outside the original circle. This will produce point C.
 Figure 3 |
|
| 14. Next, we hide the circle passing through point C. Right click the circle and then select Show Object. | |
| 15. To create our tangent circle with center C and radius 1, type circle[C,1].
Figure 4 |
|
|
|
16. Next, we also rotate B’ about point C a degrees counter clockwise. To do this, select the Rotate Object around Point by Angle, click point B’, then click point C to display the Rotate Object around Point by Angle.
 Figure 5 |
| 17. In the Rotate Object around Point by Angle, type a in the Angle name text box, select counter clockwise, and then click the OK button. This will produce point B’’ (see Figure 6). | |
| 18. Next, we hide the ray AB and point B’ by right clicking them (in hiding the ray, right click the ray/line, not the points) and clicking Show Object from the context menu. | |
19. Click the Segment between Two Points, click point C and the click B’’ to construct the radius CB’’.
 Figure 6
|
|
| 20. Now, we trace the path of point B’’ by right clicking it and then selecting Trace On from the context menu. | |
| 21. Hide the labels of the points, by right-clicking each of them and choosing Show label from the context menu. | |
| 22. To animate the circle, right click the slider and then select Animation On. Your drawing should look like first figure above (with the red point). You can pause the animation by Pause button located at the lower left corner of the drawing pad.Note: The color of point B’’ was changed to red. |