This is the fourth tutorial in the GeoGebra Essentials Series. If you are not familiar with GeoGebra, you may want to read the Introduction to GeoGebra post and earlier GeoGebra tutorials in this series. It contains the pre-requisite materials for this tutorial.
In the tutorial below, menu commands, located in the menu bar, are in brown bold text, and submenus are denoted by the > symbol. For example, Options>Labeling> New Points Only means, click the Options menu, choose Labeling from the list, then select New Points Only. The GeoGebra tools are denoted by orange texts. For example, New Point means the new point tool.

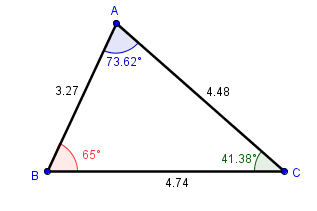
In this tutorial, we use GeoGebra to investigate the relationship between the interior angles of a triangle and the lengths of its sides. We also learn two new tools – the Angle and the Distance or Length tool. In addition, we discuss how to change the basic properties (color, width, and style) of mathematical objects. The output of our tutorial is shown above.
GeoGebra Essentials 4 – Angles, Lengths, and Object Properties
In doing the tutorial, we are going to learn the following:
- Use the tools we have discussed in previous tutorials
- Learn how to use new tools including Angle tool and Distance or Length tool
|
1. Open GeoGebra. Select Geometry from the Perspective panel to remove the axes and Algebra view. To do this, select Options>Labeling> New Points Only from the menu bar. |
 |
2. Construct segment AB by selecting the Segment between Two Points tool and then clicking two different locations on the Graphics view. Using the same tool construct BC and AC. |
 |
3. We now determine the length of the sides of the triangle. To do this, select the Distance or Length tool, and then click the three segments1. After clicking the lengths of segments will be shown just like in Figure 1.
 Figure 1 |
 |
4. Now select the Move tool and drag the vertices of the triangle. What do you observe? |
 |
5. Now, we measure the angles of the vertices by constructing angles using the Angle tool. To find the measure of angle A, select the Angle tool, click point C, click point A, and then click point B. Now, using the same steps2, construct the measure of angle B and angle C.
 Figure 2 |
|
6. If you move the vertices of the triangle, you will notice that at times the angles become a reflex angle or angles measuring more than 180 degrees, such as angle B in the figure above. We will not allow this measure. To do this, right click the angle and select Object Properties from the context menu to open the Preferences window. |
|
7. In the Object Properties window (Figure 3), select the Basic tab, and then select 0˚and 180˚ in the Angle Between drop down. |
|
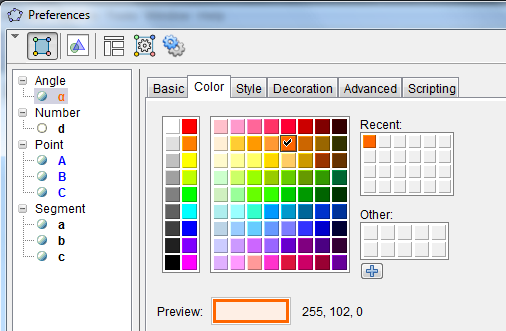
8. We now change the color of the angle signs (the green sectors). To do this, select angle  , then select the Color tab of the Preferences dialog box, choose your color of choice from the color palette. , then select the Color tab of the Preferences dialog box, choose your color of choice from the color palette.

Select the other angles and change their colors. To finish, click the Close button. |
|
9. We now the appearance of the line segments a little bit thicker. To do this, right click one of the segments, and the select Object Properties from the context menu. |
|
10. In the Object Properties window, select the Style tab, and then adjust the Line Thickness to 5. To finish click the close button. Do this to the other segments. |
 |
11. Now select the Move tool and drag the vertices of the triangle. What do you observe about the measure of the angles and the lengths of the segments? |
|
12. Save your file by clicking File>Save on the menu bar. Name your file as essentials4. |
Notes:
1You can also find the distance between A and B by clicking point A and then clicking point B. However, if you do this, the label of your segment will be AB=d, where d is the length of your segment.
2In creating angle ABC, the order of clicking the points does not matter as long as you make B second in order. So clicking A, then B, then C is the same as clicking C, then B, then A.
Last update: 22 October 2015 (GeoGebra 5.0)


