WordPress Blogging Tutorial 3 – Publishing Your First Blog
In the previous article, we have discussed the basics of blogging. We have typed our draft, inserted pictures and saved it. In this post, we are going to discuss the finishing touches of our first post and then publish it.
Before we publish our first blog, we must do two more things: We will add categories and then add tags. We want search engines (Google, Yahoo, MSN) to see our post. The best way of doing this is placing categories and tags in each of our post. Of course, at first, search engines will not place our blog at the top list during a search, but as more visitors visit our blog, and as more articles are being posted, it will increase its search engine rankings, and will increase the probability of being listed when a search is performed.
A category is a content specification of a post. For instance, since our blog is about high school mathematics, we might want include categories such as Algebra, Geometry, Trigonometry, Probability, Statistics and Calculus. Of course, we can add more categories such as Math Games, Famous Mathematicians, or anything related to high school mathematics. Our first post, the Pythagorean Theorem falls under Geometry and Trigonometry categories.
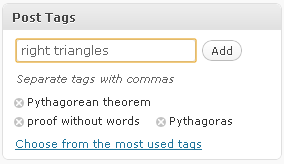
Tags are the keywords that are related to our article. The possible tags for our post The Pythagorean Theorem are Pythagorean theorem, proof without words, Pythagoras, and right triangles. Notice that tags are more content-specific than categories.
Can you think of other tags? Remember that you must type as many tags as you can – words which are related to your post.
Now that you know what tags and categories are, we will now put them in our blog. To do this, Log in to your WordPress Account and open the Dashboard.
I. Placing Categories in your blog post
- To look for your saved draft, go to the Recent Drafts panel at the right side of your Dashboard, and then select Pythagorean Theorem, the title of our blog.
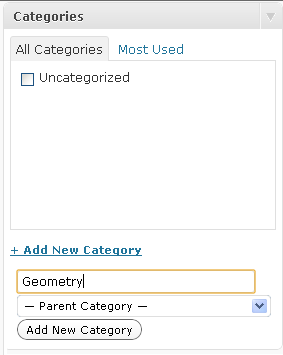
- To add a category, go to the Categories panel (see Figure 1 below) located at the right part of your Dashboard.
- Click the +Add New Category at the bottom of the Categories panel
- A textbox will appear; type Geometry, and then click Add New Category button.
- We add another category namely Trigonometry. We can add other categories for future blogs, or we can add later when we post another blog.
- The Geometry and Trigonometry categories check box will appear in the categories list box window (below the Uncategorized check box).
- Check the Geometry and Trigonometry check box to finish.

II. Placing Tags in your Blog Post
- To place tags in your post, go the Post Tags panel.
- Type the tags in the tags text box and then click the Add button. You can type the tags one by one, then click the Add button, or you can type all of the tags separated by commas.
- Add as many tags as you can.

III. Publishing your Blog
Now that we have finished our blog, we can now click the Publish button to publish our blog.
In the next post, we will discuss about linking texts and pictures to other blogs.