Area Tutorial 5 – Area of a Trapezoid

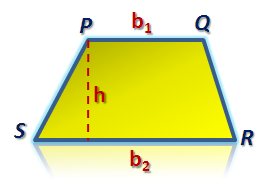
In this tutorial, we are going to derive the area of a trapezoid. A trapezoid (sometimes called a trapezium) is a quadrilateral with exactly one pair of parallel sides. Trapezoid PQRS is shown below, with PQ parallel to RS.  We have learned that the area A of the trapezoid with bases b_1 and b_2 and altitude h is given by the formula A_{PQRS} = \displaystyle\frac{(b_1 + b_2)h}{2}.

Figure 1 - Trapezoid PQRS with PQ parallel to RS.

We are going to derive the area of a trapezoid in two ways: First by dividing into different sections and second by rotation.

Derivation 1: Area by Dividing into Regions

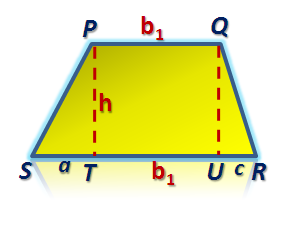
If we drop another line from Q, then we will have two altitudes namely PT and QU, which both have length h units.

Figure 2 - Trapezoid PQRS divided into two triangles and a rectangle.

From Figure 2, it is clear that Area of PQRS = Area of PST + Area of PQUT + Area of QRU. We have learned that the area of a triangle is the product of its base and altitude divided by 2, and the area of a rectangle is the product of its length and width. Hence, we can easily compute the area of PQRS. It is clear that A_{PQRS} = (ah/2) + b_1h + (ch/2).  Simplifying, we have  A = \displaystyle\frac{ah + 2b_1 + ch}{2}. Factoring we have, A_{PQRS} = (a + 2b_1 + c) \frac{h}{2} = [(a + b_1 + c) + b_1] \frac{h}{2}. But, a + b_1 + c is equal to b_2, the longer base of our trapezoid. Hence, A_{PQRS}= (b_1 + b_2) \frac{h}{2}.

Derivation 2: By Rotation

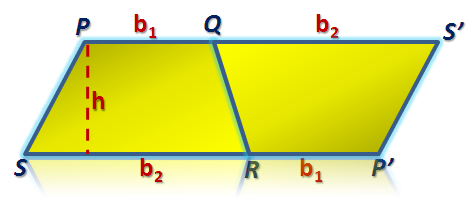
In the second derivation, we are going to duplicate the trapezoid and rotate it as shown below. It is evident that quadrilateral PS’P’S is a parallelogram (Why?). But we have learned that the area of the parallelogram is the product of its height and its base. Hence, A_{PS'P'S} = (b_1 + b_2)h.

Figure 3 - PQRS translated and rotated to form a parallelogram.

But the area of the trapezoid PQRS is half of the area of the parallelogram PS’P’S. Thus, A_{PQRS} = \displaystyle\frac{(b_1 + b_2)h}{2}.

Enjoy and Learn More

Area Tutorial 4 – Derivation of the Area of a Circle

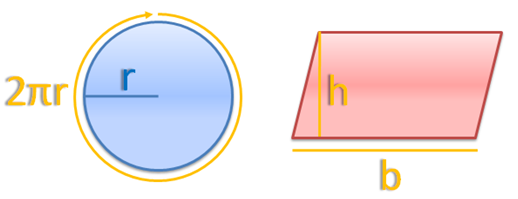
We have learned that the area of a parallelogram is the product of its base and its height, and the circumference of a circle with radius r is 2 \pi r.

Figure 1 – A circle with radius r and a parallelogram with base b and altitude h.

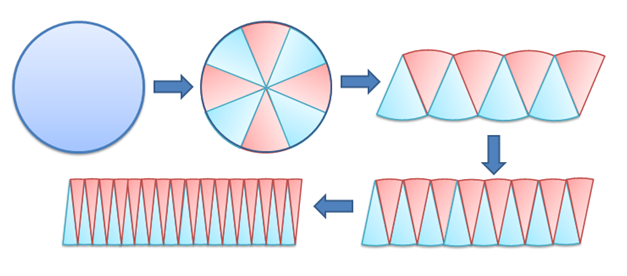
To find the area of a circle with radius r, divide it into congruent sectors (blue and red divisions) then arrange them as shown below.

Figure 2 – As the number of sectors increases, the shape of the rearranged sector is becoming more and more parallelogram-like.

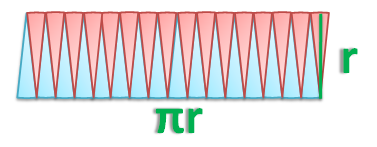
Observe that as the number of sectors increases, the shape of the rearranged sectors is becoming more and more like a parallelogram. In fact, if we can divide the circle into an infinite a number of sectors, it seems that the shape of the rearranged sector is a parallelogram.  Assuming that this is true, then the base of a parallelogram is \pi r  (Explain why.), and its altitude is r.

Figure 3 – The base of the parallelogram is pi*r and its height is r.

Since the area of a parallelogram is bh, we just have to multiply the base of the parallelogram which is \pi r and its height which is r to find its area. Therefore, the area of the parallelogram, which is equal to the area of a circle, is \pi r^2.

Another derivation

We can also derive the area of a circle by unwinding an infinite number of circular tracks. The smaller the width of our track becomes, the rearranged figure becomes more and more like a triangle. If it is indeed a triangle, then its area is the product of its height and its width.

Figure 4 – The base of the parallelogram is pi*r and its height is r.

Recall that the area of a triangle is the product of its base and height divided by 2.  Since the base of the of the triangle is equal to the circumference of the circle  (2 \pi r), and its height is equal to its radius (r), therefore, the area of the triangle, which is equal to the area of the circle, is \displaystyle\frac{(2 \pi r)(r)}{2} = \pi r^2.

The processes that we have done above are logical; however,  we only assumed that we can divide the circle into infinite number of sectors, or we can unwind an infinite number of tracks.  These are just assumptions, hence, we are not yet sure if the area of the circle is indeed \pi r^2. Of course, we know it is true but we need a proof.  The proof finding the area of a circle needs knowledge on integral calculus. We will discuss the proof of the area of the circle in the future.

Enjoy and Learn More

GeoGebra Basic Construction 3 – Right Triangle

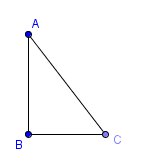
In this construction, we  use the Perpendicular Line tool to create right triangle ABC where angle B is the right. First, we construct segment AB, then construct a line perpendicular to segment AB and passing through B. Then, we construct point C on the line, hide the line and connect B to C as well as connect A to C with the segment tool.

Figure 1 – Triangle ABC right angled at B.

The detailed steps are enumerated below.

1.) Open GeoGebra and select Geometry for the Perspectives menu at the Sidebar.
2.) Click the Segment between Two Points tool and click two distinct places on the Graphics view to construct segment AB.
3.) If the labels of the points are not displayed, click the Move button, right click each point and click Show label from the context menu.
4.) Next, we construct a line parallel perpendicular to segment AB and passing through point B. To do this, select the Perpendicular Line tool, click segment AB, then click point B.
5.) Next, we create point C on the line. To do this, click the New Point tool and click on the line. Your drawing should look like the figure below. Display the label of the point in case it is not shown (see no. 3)

Figure 2 – Line BC perpendicular to segment AB.

Bbe sure that you can only drag point C on the line. Otherwise, you have to delete the point and create a new point C.

8.) Next, we hide the line passing through B. To hide the line, right click the line and uncheck Show Object from the context menu.

9.) Select the Segment between Two Points tool and connect B and C. With the same segment tool, connect A and C.

10.) Using the Move tool, drag the vertices of the triangle. What do you observe?
11.) If you want,  can use the Angle tool to verify the measure of angle B. To do this, click the Angle tool, and click the  vertices of the triangle in the following order: point C, point B and point A.

You can also construct and equilateral using other tools. As an exercise, try constructing a right triangle using the following:

  1. Circle tool and segment tool
  2. Angle Bisector Tool
1 5 6 7 8