GeoGebra Tutorial 1 – Quadrilaterals & Midpoints
If this is your first time to use GeoGebra, I suggest that you read Introduction to GeoGebra which contains the discussion about the basics of GeoGebra and parts of the GeoGebra window. The assumption in this tutorial is that you are already familiar with the parts of the GeoGebra window.
In the tutorial below, menu commands, located in the menu bar, are in brown bold text, and submenus are denoted by the > symbol. For example, Options>Labeling> New Points Only means, click the Options menu, choose Labeling from the list, then select New Points Only. The GeoGebra tools are denoted by orange texts. For example, New Point means the new point tool.
Problem: Investigate what happens if you connect the the consecutive midpoints of a quadrilateral.
In this tutorial, we use GeoGebra to explore the properties of the midpoints of a quadrilateral. In doing this tutorial, you will learn how to use the following tools: Move, Midpoint or Center, Segment between Two Points and Polygon. If you want to view the output of this tutorial, click here.
| 1.) Open GeoGebra and select Algebra from the Perspective menu . | |
| 2.) To construct the vertices of the quadrilateral, click the New Point tool, and then click four distinct places on the Graphics view. | |
| 3.) If the labels of the points are not displayed, click the Move tool, right click each point and click Show label from the context menu. | |
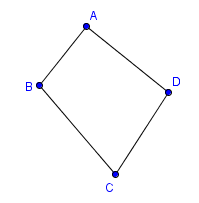
4.) Select the Segment tool and click point A and click point B two distinct points to construct segment AB. To construct BC, with the Segment tool still active, click point B and another location to create segment BC. Now, construct CD and AD to complete the quadrilateral. Your drawing should look like Figure 1.
 Figure 1 – Quadrilateral ABCD |
|
|
|
5.) Click the Move tool and move the vertices of the quadrilateral. What do you observe? |
| 6.) To determine the midpoint of each side of the quadrilateral, choose the Midpoint or Center and then click the segments (not the points) in the following order: AB, BC, CD, and AD. |
|
|
|
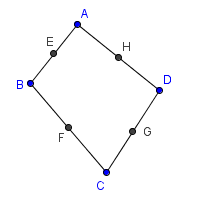
7.) Select the Move tool, right click the midpoints and click Show label from the context menu. After that step, your drawing should look like Figure 2.
 Figure 2 – Quadrilateral ABCD with Midpoints E, F, G and H. |
|
|
8.) Move the vertices of the quadrilateral. What do you observe? |
| 9.) To have a better view, connect the midpoints of the quadrilateral using the Polygon tool. To do this, click the Polygon tool and click the points in the following order: Point E, point F, point G, point H and then point E again to close the polygon. | |
|
|
10. Move the vertices of the quadrilateral. What do you observe about the figure? |
| 11. What conjecture can you make based on your observation? |
Updated: 11 January 2016 (GeoGebra 5.0)