Introduction
Wingeom is a dynamic geometry software created by Philip Exeter University. It is capable of 2-dimensional and 3-dimensional geometric drawing and construction.
This is the first tutorial of the Wingeom Tutorial Series. Most of the construction in this tutorial series will deal with 2-dimensions.
The Wingeom Environment
When you open Wingeom, the window shown below will appear. You have to click the Window menu, then choose the environment that you want to display. Wingeom can construct figures in Euclidean, hyperoblic and spherical plane.

Figure 1 – The Wingeom window.
It is also capable of constructing Voronoi diagrams and tessellations.
Using Wingeom in Exploring the Midline Theorem
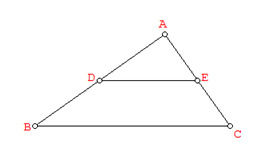
In this construction, we will explore the relationship of a triangle and its midline (or midsegment), the segment connecting the midpoints of its two sides as shown in Figure 2.

Figure 2 – Triangle ABC with midline DE.
In the construction below, we will construct 3 points A, B and C and connect them with the segment tool. After drawing the triangle, we will get the midpoints of AB and AC and explore the length and interior angles of the two triangles formed.
To perform the construction, follow the construction steps below and answer the questions.
Construction Steps
1.) To open the construction window shown in Figure 2, click the Window menu and then click the 2-dim option.
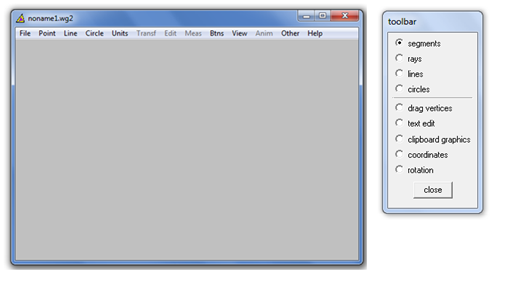
2.) Next we will show the Wingeom toolbar. The toolbar displays the tool that we can use to draw and manipulate geometric figures. To display the toolbar, click the Btns menu and then click Toolbar.

Figure 3 – The Wingeom window and its toolbar.
3.) The first step in our construction, we will draw the vertices of our triangle. To do this, right click three different locations on the drawing pad. Notice that Wingeom automatically names the points in alphabetical order.
4.) Next, to construct the sides of the triangle, select the segments option button in the toolbar then drag point A to point B to construct segment AB.
5.) Using the steps in 4, draw segments AC and BC.
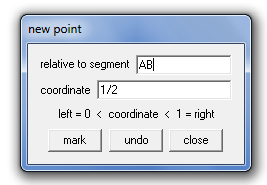
6.) Next, we will draw the midpoint of AB. To do this, click the Point menu and then click on Segment… to display the new point dialog box.

Figure 4 – The new point dialog box.
7.) In the relative to segment, type AB, leave the coordinate to 1/2 and then click the mark button. Notice that point now lies on AB. This means that Wingeom should construct a segment halfway of AB.
8.) To create a midpoint of AC, delete the text in the relative to segment text box and type AC. Then click the mark button. Notice that point E now lies on AC. Click the close button in the new point dialog box to finish.
9.) Draw segment DE. Refer to step 4.
10.) Let us see what happens if we drag the vertices of the triangle. To drag the vertices of the triangle, click the drag vertices option button on the toolbar, then drag the vertices of the triangle.
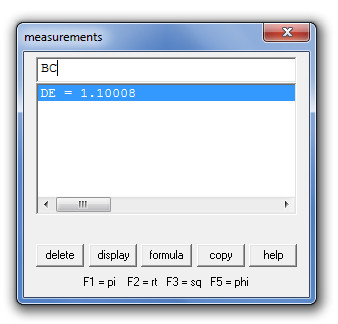
11.) Now, we will display the length of DE and BC. To display the length of DE. To do this, click the Meas menu to display the measurements dialog box. Type DE in text box of the measurements dialog box and then click the ENTER key.

Figure 5 – The measurements dialog box.
12.) Next type BC in the text box and then press the ENTER key. What can you observe about the lengths of segments BC and DE?
13.) Select the drag vertices option button on the toolbar and drag the vertices of the triangle. Is your observation still the same?
14.) Next, we will try to observe the relationship among the interior angles of two triangles – triangle ABC and triangle ADE. First we will display the measure of angle ABC. To do this, type <ABC in the text box of the measurements dialog box and press the ENTER key.
15.) Display the measures of the following angles using step 14: ADE, AED and ACB.
16.) What do you observe about the measures of the interior angles of triangle ABC?
17.) Close the measurements dialog box and drag the vertices of the triangle (refer to step 13). Are your observations still the same?
18.) Based on your observations, make a conjecture about the relationship of triangle ABC and its midline DE.
19.) Prove your conjectures.


