GeoGebra Tutorial 8 – Tracing the Graphs of Trigonometric Functions
This is the eighth tutorial of the GeoGebra Intermediate Tutorial Series. If this is your first time to use GeoGebra, you might want to read the GeoGebra Essentials Series.
In this tutorial, we use the Input bar to create mathematical objects particularly a circle, an arc, and a point that traces the sine and cosine function. In doing the tutorial, we learn the following:
- use the GeoGebra keyboard commands to construct various geometric objects
- use the GeoGebra trace function
- change the interval of the x-axis
Construction Overview
First, we create a point A at the origin, and then create a circle with center A and radius 1 unit. Second we create B at (1,0) and point C on the circumference of the circle. Third we measure the arc length of BC and use it as the y-coordinate of point P which will trace the sine function. The partial output of this tutorial is shown in Figure 1.

Figure 1 – The sine wave produced by a point trace.
In Figure 1, as point C moves counterclockwise along the circumference of the circle, point P moves rightward. Its path as shown by the thick curve is known as the sine function.
Instructions
1.) Open GeoGebra and be sure the Algebra & Graphics view is displayed (Perspectives menu).To create point A at the origin, type A = (0,0) in the Input bar and press the ENTER key on your keyboard.
2.) Next, to construct a circle with center A and radius 1, type circle[A,1] in the Input Bar and press the ENTER key on your keyboard.
3.) We fix point A to prevent it from being accidentally moved. To fix the position of point A, right click on point A, and then click Object Properties from the context menu. This will display the Preferences dialog box shown in Figure 2.
4.) In Basic tab of the Preferences dialog box, click the Fix Object check box to check it, then close the window.
5.) To construct point B at (1,0), type B = (1,0).
6.) Fix the location of point B (refer to steps 3-4).
7.) To construct point C on the circumference of the circle, click the New Point tool and click on the circumference of the circle. Your figure should look like Figure 3.

Figure 3 – The unit circle with points B and C on its circumference.
8.) We now change the interval of the x-axis from 1 to π/2. To do this, right click Graphics from the context menu.
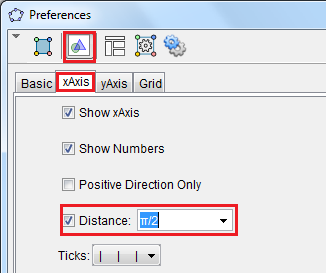
9.) In the Settings dialog box, click the Graphics button, and then click the xAxis tab.
10.) In the x-Axis tab, click the Distance check box to check it and choose π/2 from the Distance drop-down list box.
11.) Now we create arc BC of circle with center A starting from B and going counterclockwise to C. To do this, type circularArc[A, B, C].
12.) Right click the arc BC, then click Object Properties to display the Preferences window.
13.) In the Preferences window, choose the Basic tab, be sure that the Show label check box is checked and choose Value from the drop-down list box. This will display the length of arc BC.
14.) Next, we change the color of the arc to make it visible. Click the Color tab and choose red (or any color you want except black) from the color palette.
15.) Click the Style tab, then adjust the Line Thickness to 5, then click the Close button. Your drawing should look like the one shown in Figure 6.
 16.) Next, to construct the point that will trace the sine wave, we construct an ordered pair (d,y(C)) where d is the arc length of BC and the y(C) y-coordinate (or the sine) of point C. To do this, type P = (d,y(C)).
Q1: Move point C along the circle. What do you observe?
17.) To trace the path point P, right click on P and click Trace on from the context menu.
Q2: Now, move point C along the circumference of the circle and see the path of P.

Figure 7 – The appearance of the drawing after Q1.
18.) To create point Q that will trace the cosine wave, type Q = (d,x(C)).
19.) Activate the trace function of point Q (see Step 17).
Q3: Now, move point C along the circumference of the circle and observe the path of point Q. What do you observe?
Challenge: Using the diagram that you have created above, graph the other four other functions namely tangent, contangent, secant and cosecant functions.