Using Google Sketchup in Teaching Mathematics
Last March 2010, we have discussed several ways on using Google Sketchup to enhance geometric drawings as well as how to use it in classroom teaching. In this article, we will discuss more ideas on how to use Google Sketchup in teaching mathematics.
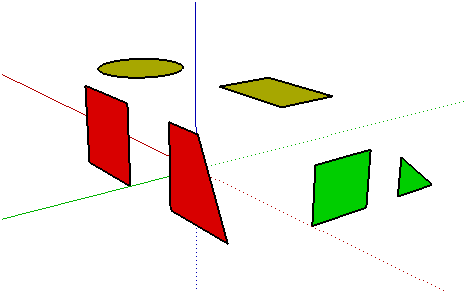
Although Google Sketchup is a drawing software, it can be very helpful to mathematics teachers especially in teaching three dimensional geometry. Using Sketchup, it is easy to demonstrate what do we mean by coplanar or non-coplanar as shown in Figure 1.

Figure 1
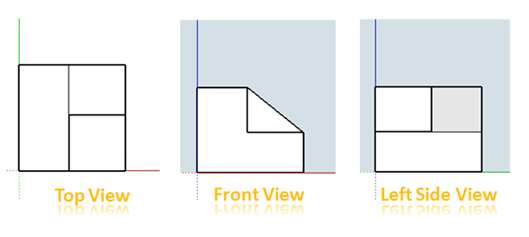
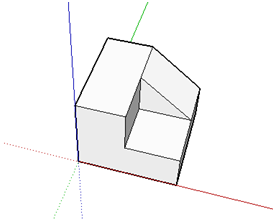
Of course, we can do this using a flat surface, say a table, but Google Sketchup is good for reinforcement since it can be manipulated to view surfaces and solids from any direction. This capability enables the user to view the front, back, top, bottom, and side (left or right) of a solid. For instance, the front, side and top views of a the solid shown in Figure 2 is shown in Figure 3.
In addition, it is very easy to construct solids using Google Sketchup. Click the video below to watch how to construct Figure 2.
Several exercises can be done using the solid above.
- Let the students manipulate the solid and draw their nets.
- Let the students get the surface area of the solid.
- Let the students draw the front, side, and top views of the solid.
- Let the students do the reverse of 3 – that is, draw the front, side, and top view, and let the students draw the solid. This is a very good visualization exercise.

Figure 3
If you have drawn a solid, you can get the different 2D views such as Top, Bottom, Front, Back, Left, or Right by selecting the Camera menu from the menu bar and clicking Standard Views.
One reminder though: To get the different two dimensional views of a 3D object, you must switch first to the Parallel Projection mode. To do this, click the Camera menu, and then select Parallel Projection. You can try the Perspective, when 2D viewing and see the difference.
