GeoGebra Tutorial 5 – Discovering the Pythagorean Theorem
This is the fifth tutorial in the GeoGebra Intermediate Tutorial Series. If this is your first time to use GeoGebra, please read the GeoGebra Essentials Series.
In this tutorial, we compare areas of squares formed on the sides of a right triangle. To construct this figure, we first construct a right triangle, and form three squares, each of which contains one of the three sides as shown below. Then we observe the relationship among the areas of the squares.

Figure 1 – Squares formed containing the sides of a right triangle
In this tutorial, we learn how to use the Regular Polygon tool. Most of the constructions that you will make here are review of the first four tutorials.
Instructions
| 1.) Open GeoGebra and select Geometry from the Perspective panel. | |
| 2.) Select the Segment between Two Points tool and click two distinct places on the Graphics view to construct segment AB. | |
| 3.) If the labels of the points are not displayed, click the Move tool, right click each point and click Show label from the context menu. | |
| 4.) Next, we construct a line perpendicular to segment AB and passing through point B. To do this, choose the Perpendicular line tool, click on segment AB, then click on point B. | |
5.) Next, we create point C on the line. To do this, click the New point tool and click on the line. Be sure that the label of the third point is displayed.
 Figure 2 – Point C on the line passing through B You have to be sure that C is on the line passing through B. Be sure that you cannot drag point C out of the line. Otherwise, delete the point and create a new point C. |
|
| 6.) Hide everything except the three points by right clicking tmem and unchecking the Show Object option. | |
| 7.) Next, we rename point B to point C and vice versa. To rename point B to C, right click point B, click Rename and then type the new name, in this case point C, in the Rename text box, then click the OK button. Now, rename B (or B1) to C. |
|
| 8.) Next we construct a square with side AC. Click the Regular polygon tool, then click on point C and click on point A. | |
|
|
9.) In the Points text box of the Regular polygon tool, type 4. If the position of the square is displayed the wrong way (right hand side of AC) just undo button and reverse the order of the clicks when creating the polygon.
 Figure 3 – Square containing side AC |
|
|
10. ) With the Polygon tool still active, click point B and click point C to create a square with side BC. Similarly, click point A, then click point B to create a square with side AB. After step 10, your drawing should look like the one shown below.
 Figure 4 – Squares containing sides of right triangle ABC
|
| 11.) Hide the label of the sides of the side of the squares. | |
12.) Rename the sides of the rectangle as shown below.
 Figure 5 – Triangle ABC wth side lengths a, b and c.
|
|
| 13.) Now, let us reveal the area of the three squares. Right click the interior of the square with side AC, then click Object Properties from the context menu to display the Preferences window. | |
14.) In the Basic tab of the Preferences window, check the Show Label check box and choose Value from the drop-down list box. Do this to the other two squares as well.
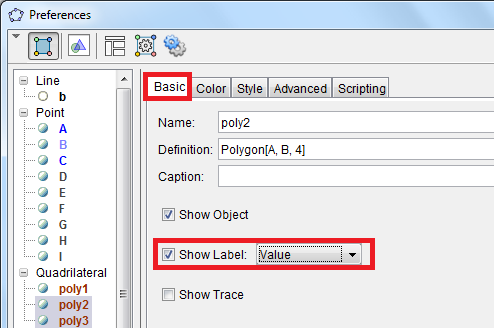 Figure 6 – Properties of squares shown in the Preferences window. |
|
| 15.) Move the vertices of the triangle. What do you observe about the area of the squares? | |
| 16.) You may have observed that the area of the biggest square is equal to the sum of the areas of the two smaller squares. To verify this, we can put a label in the GeoGebra window displaying the areas of the three squares. | |
| 17.) Suppose the side of the two smaller squares are a and b, and the side of the biggest square is c, what equation can you make to express the relationship of the of the three squares? | |
| 18.) What conjecture can you make based on your observation? |