GeoGebra Tutorial 10 – Vectors and Tessellation
This is the 10th tutorial in the GeoGebra Intermediate Tutorial Series. If this is your first time to use GeoGebra, you might want to read first the GeoGebra Essentials Series.
This tutorial is the sequel of GeoGebra Tutorial 9 – Vector and Translation. In this tutorial, we use the idea of translation to tessellate the plane. Tessellation is a process of covering a plane with no gaps and no overlaps.
The final output of our tutorial is shown in Figure 1 and the GeoGebra applet can be viewed here.
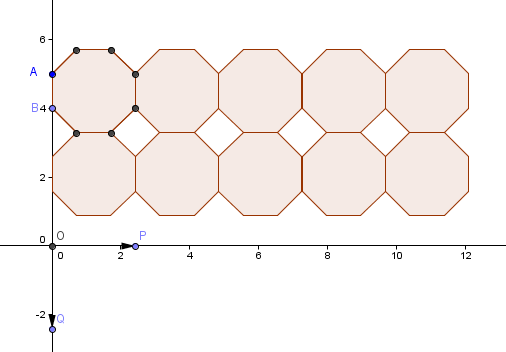
Figure 1 – Octagon and squares tessellating the plane.
To give you the whole picture, I have enumerated the summary of what we are going to do in this construction.
- Construct an octagon containing points A at (0,5) and B at (0,4).
- Draw point O at the origin which is the initial point of vector, P at the positive x-axis and vector Q at the negative y-axis. P and Q are the terminal points of the vectors.
- Draw vectors u (containing O and P) and v (containing O and Q).
- Translate the octagon to tessellate the plane using vector u.
- Translate all the created octagons down using vector v.
- Draw a square that will cover the space at the center of the 4 leftmost adjacent octagons.
- Translate the square to the right using vector u.
Construction Protocol
| 1.) Open GeoGebra and select Algebra & Graphics from the Perspectives menu. | |
| 2.) Click the New Point tool and place two points in the coordinates given: A on (0,5) and B in (0,4). | |
3.) Select the Regular Polygon tool, click point A, then click point B to display the Regular Polygon dialog box. In the dialog box, type 8, then press the OK button. If the labels of the points and the segments are displayed, remove them by right clicking them and unchecking on Show label from the context menu.
 Figure 2 – Octagon with containing segment AB. |
|
|
|
4.) Next, we create three points which will be the initial and terminal points of the vector (see Figure 1). Click the New Point tool, click on the origin, click a point on the positive x-axis near the origin and the negative y-axis near the origin. |
| 5.) We now rename the three points. To rename the point on the origin, right click it and click Rename from the context menu. In the Rename box, type O and press the OK button. Rename the point on the x-axis as P and the point on the y-axis Q. | |
| 6.) Now, to create vector u, select the Vector between Two Points tool, click on point O, then click on point P. To create vector v, with the Vector between Two Points tool still active, click point O and then click point Q to create vector v. | |
| 7.) To translate the octagon to the right, select the Translate Object by Vector tool, click the interior of the octagon, then click vector u. | |
|
|
8.) Adjust vector u such that the right vertical side of the first octagon coincides with the left vertical side of the translated octagon. Your drawing should look like Figure 3.
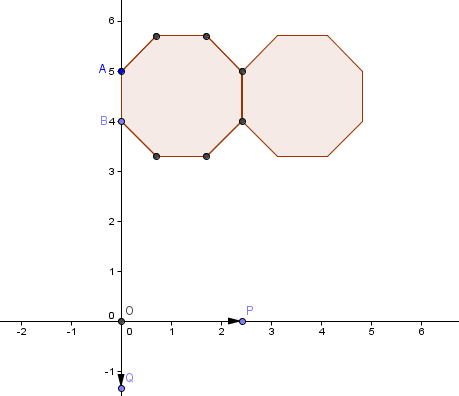 Figure 3 – An octagon and its translation using vector u. |
| 9.) To translate another octagon, with the Translate Object by Vector tool still active, click the rightmost octagon, then click vector u. Repeat this step three times giving us 5 octagons with adjacent vertical sides. | |
| 10.) Next, we translate the octagons down vertically. To do this, select the Translate Object by Vector tool, click the leftmost octagon and then click vector v. Adjust the translated octagon by moving point Q such that the lower horizontal side of the original octagon coincides with the upper horizontal side of the translated octagon. | |
| 11.) Repeat step 10 until all the 5 octagons are translated down. After step 11, your figure should look like Figure 1 with white squares. | |
| 12.) The last part of the task is to cover the empty square spaces between octagons. To do this, click the Regular Polygon tool, click the two consecutive points of the leftmost square (on the side of the octagon) to display the Regular Polygon dialog box. | |
| 13.) Type 4 as the number of Vertices and then click OK. If the square created is on the other side, undo the step, and reverse the order of the click. | |
| 14. ) To tessellate, click the square and then click vector u. Repeat the translation as you have done in step 9. |