Free Technology for Teachers

If you are looking for a way integrate ICT in your teaching, Free Technology for Teachers is probably the best place that you can explore. Free Technology for Teachers has about  three thousand posts  introducing new software, reviewing web 2.0 tools, citing resources, providing tutorials, and giving insights on how to integrate tools in teaching.

Free Technology for Teachers discusses topics in many fields – mathematics, science, foreign language, and many others.  It is hosted by Richard Byrne

Annotating and Zooming with the ZoomIt Software

ZoomIt software enables you to zoom and draw (or annotate) anywhere on your screen. When I said anywhere, I really mean anywhere. You can draw on your desktop, toolbars, widgets or even icons. The examples below show writings on a Powerpoint slide show and two icons.

Figure 1 – ZoomIt is used to annotate the Powerpoint slide while in Slide Show mode.

The ZoomIt drawings, however, are not permanent. Once you press Esc key, all your Zoomit drawings are erased.  If you want a permanent writing pad, you can use Miscrosoft PaintBrush or Classic Whiteboard.

Figure 2 – ZoomIt can be used to write even on icons.

Once you install ZoomIt, you just have to click its icon and then press the combination key to activate it. By default, Zoomit allows you to draw by pressing the Ctrl+2 (that is, holding the Control key on your keyboard and then pressing 2) and zoom by pressing Ctrl+1.
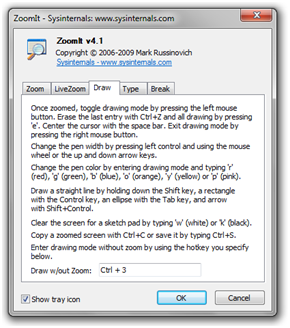
Figure 3 – The ZoomIt dialog box.

You can change the combination keys to activate drawing and zooming. You just have to double click the ZoomIt icon to display the dialog box shown in Figure 3. If you want to change the control keys, you just click the text box (for example, Draw w/o Zoom text box), then press the combinations keys that you want on your keyboard.

Geonext Tutorial 2 – Constructing a Square

In Geonext Tutorial 1, we used the circle and polygon tools to construct an equilateral triangle.  In this tutorial, we are going to use the circle, the parallel and the perpendicular line tools to construct square ABEC shown in Figure 1.

Figure 1 - Square formed by construction using circles, parallel and perpendicular line tool.

In constructing our square, we will first construct the a circle with radius AB, construct a line perpendicular to AB, passing through point A (see line CD), construct a line parallel to CD passing through point B (see line EB), then construct a line parallel to AB and passing through C (see line CE). We then hide all the objects except the vertices of the square and line segment AB, and use the segment tool to construct square ABEC. Follow the instructions below to construct the square.

Instructions

1. Open Geonext. Click the New Board button.
2. To construct a circle with center A passing through point B, click the Circle tool, click the drawing board to determine the center of the circle, then click another location to determine its radius. Notice that Geonext, automatically names the points in alphabetical order.


3. Double click the Straight Line icon to display the list of tools. Choose Line segment tool. Observe that the Straight Line tool icon on the toolbar is replaced by the Line Segment icon.  Click point A and then click point B to construct radius AB.

Figure 2 - Tools that appear when you double click the Straight line tool in the toolbar.

4. To construct a line perpendicular to AB passing through point A, double click the Line Segment tool to display the related tools. Choose the Perpendicular line tool, click segment AB, then click point A.
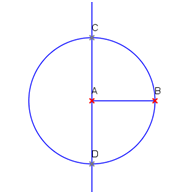
5. Next we construct the intersection of the line constructed in step 4 and the circle. To do this, click the Point tool, then click one of the intersections. Observe that Geonext automatically names the point C and the opposite point D. After step 5, your drawing should look like Figure 3.

Figure 3 - The appearnce of the drawing after step 5.

6. We now construct a line parallel to CD and passing through point B. To do this, double click the Perpendicular line tool to display the list of related tools, and choose Parallel line. Click line CD (not the points), then click point B.
7. Applying step 6, construct a line parallel to AB and passing through point C.

8. Using the Point tool, draw the intersection the line parallel to AB, and the line perpendicular to AB passing through point B. Geonext will name this point E.
9. Next we hide all the objects except the vertices square ABEC and segment AB. To hide the objects, double click the Rename tool (located at the bottom of the toolbar), and choose Hide. Click all the objects except points A, B, C, E and line AB. Notice that all the clicked objects change colors. These are the hidden objects.
10.  Click the Move tool and move the vertices of the square. What do you observe?
11.  Using the Line segment tool, construct segments AC, CE and BE and we are done.

12.  Move the vertices of the square. What do you observe?
Exercises:

  1. Verify that the figure is a square using the angle tool and by revealing the length of the sides (Refer to Tutorial 1).
  2. Based on the construction above, prove that ABEC is a square.
1 2