GeoGebra Tutorial 13 – How to use Latex in GeoGebra

This is the 13th GeoGebra Tutorial in the GeoGebra Tutorial Series and in this post, we learn how to use Latex in GeoGebra. If this is your first time to use GeoGebra, you might want to read the GeoGebra Essentials Series first.

In my previous posts, we have discussed how to use Latex in writing mathematical equations in blogs and websites,  and we also have learned the most commonly used Latex commands.

For those who are new to  Latex, it is a typesetting program capable of generating mathematical expressions which can be embedded in blogs, forums and websites.  For example, the quadratic formula below is written using Latex code

x = \displaystyle\frac{-b \pm \sqrt{b^2-4ac}}{2a}.

Fortunately, many mathematics software nowadays are compatible with Latex typesetting. In this tutorial, we learn how to use Latex in GeoGebra.  If you already know how to code Latex, then this will be very easy for you. However, if this is your first time to use Latex, you may want to read an introduction about it.

In GeoGebra, we can only code Latex using the Insert Text tool. For example, we write the of the famous Pythagorean theorem equation c2 = a2 + b2, we need to use Latex code because GeoGebra is not capable of creating superscripts, except for equations or expressions placed in the Input bar. If we will not use Latex, our equation will appear like c2 = a2 + b2 or we can use c^2 = a^2 + b^2.  But suppose the  equation that we type is more complicated – such as the quadratic formula – it is impossible for us to write it without confusing the reader.

Follow the instructions below on how to use the Insert Text tool to generate Latex code. If you want to follow the tutorial step-by-step while reading, you can open the GeoGebra window here.

Instructions

1.)    To use the text tool, select the Insert Text tool and click the part of the Graphics view where you want to place the text.  This will display the Text dialog box.

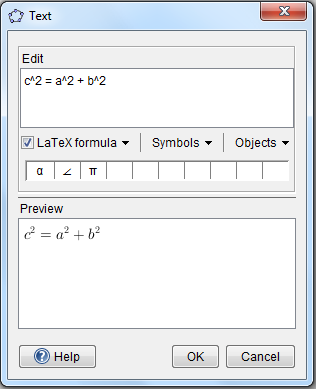
2.)    In the Text dialog box, type the code c^2 = a^2 + b^2 in the Edit box and then be sure that the Latex formula check box is checked. The ^ is the code used for exponentiation. The Preview window shows how your text will be displayed.

3.)    Press the OK button when finished. Your text should look like the one shown in Figure 3.

To combine text and mathematical expressions coded in Latex, we have to separate the text and the mathematical formula. To do this, we have to enclose the mathematical expression with dollar signs. For example, if we want to write

The hypotenuse of a right triangle with sides a and b is equal to \sqrt{a^2 + b^2}

we have to type

The hypotenuse of a right triangle with sides $a$ and $b$ is equal to $\sqrt{a^2 + b^2}$

The GeoGebra output of the code written above is shown below.

Shown below are some of the most common symbols that are used in GeoGebra.

LaTeX input Result
a \cdot b a \cdot b
\frac{a}{b} \frac{a}{b}
\sqrt{x} \sqrt{x}
\sqrt[n]{x} \sqrt[n]{x}
\vec{v} \vec{v}
\overline{AB} \overline{AB}
x^{2} x^2
a_{1} a_{1}
\sin\alpha + \cos\beta \sin \alpha + \cos \beta
\int_{a}^{b} x dx \int_{a}^{b}xdx
\sum_{i=1}^{n} i^2 \sum_{i=1}^{n}i^2

If you want to practice other latex command download the list of latex symbols or comprehensive list of latex symbols.
Can we Graph Inequalities in GeoGebra?

Update (Oct 2, 2010): The GeoGebra 4.0 version can now graph linear inequalities. Click here to read about it.

I wrote this because there are a lot of searches in my Blog Stat searching how to graph inequalities in GeoGebra. UNFORTUNATELY, GeoGebra is still working on this feature. I emailed Markus Hohenwarter, the creator and lead programmer of GeoGebra, two years ago requesting for this feature but he told me that he was still working on more important features.

There are, however, GeoGebra users who found a way to improvise. Some of the links are shown below.

http://www.geogebra.org/en/upload/files/english/Daniel_A_Kaufmann/Inequalities.htm

http://www.geogebra.org/en/upload/files/english/dtravis/sys_of_line_inequalities.html

http://www.geogebra.org/en/upload/files/italian/remigio/diseq/diseq.html

If you are just looking for a software that can graph inequalities, you can try  Graph Calculator 3D which has a free edition. The screen shot of graphs of systems of inequalities is shown below.

Notice, that graphing inequalities in this software is very easy. First, you just have to type the equations or inequalities (upper left of the diagram), then choose the graph attributes (middle left of the diagram). You can also choose 3-dimensional graphs.

I will have a separate tutorial post on how to use the Graph Calculator 3D  soon.

GeoGebra Tutorial: Graphing Functions Using GeoGebra

Basic Graphing

You can graph in by typing equations of functions in the Input box.

Figure 1 - The GeoGebra Window

Type the following equations of functions in the Input box and press the ENTER key after each equation.

  1. y = 2x + 3
  2. f(x) = -3x + 5
  3. 2x – 3y + 6 = 0
  4. g(x) = sin(x)
  5. y = x^3 – 1

Notes:

  • You can type linear equations in the following forms:  y = ax + b, f(x) = a(x) + b or ax + by + c = 0.
  • The * is used in multiplication and ^ is used in exponentiation. For example you want to graph, y = 2(x – 3)2, then you should enter y = 2*(x-3)^2.

Properties of Graph

You can change the  labels, colors, thickness and other properties of graphs (and other objects) in GeoGebra. In this tutorial we are going to change the color, label and thickness of the graph g(x) = sin(x).

To change the properties of the graph g(x) = sin(x), do the following:

1.)    Right click the graph of the sine function then click Object Properties from the context menu.

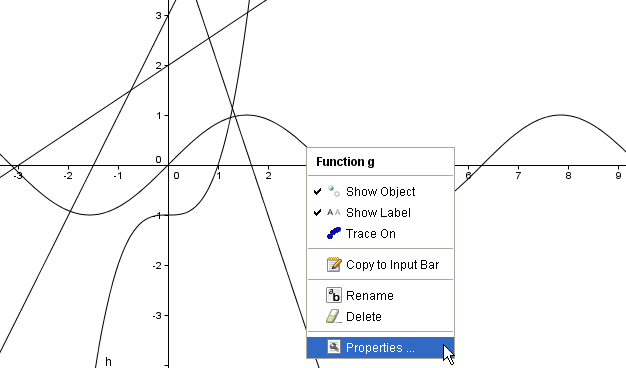
Figure 2 - The context menu that appears when you right-click a graph

2.)    In the Basic tab, be sure that the Show label check box is checked.

3.) Choose Name and Value from the Show label drop-down list box.

Figure 3 - The Basic tab of the Properties dialog box

4.)    To change the color, click the Color tab, then choose your color from the Color palette.

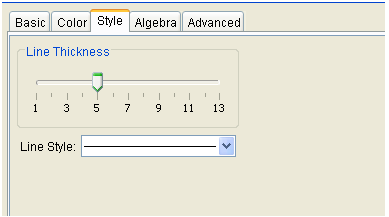
5.)    To change the thickness of the graph, click the Style tab, move the slider bar to 5.

Figure 4 - The Style tab of the Properties dialog box.

6.)    Click the Close button

Exercise: Change the properties of the other graphs. Explore the options in the Properties dialog box and see their effects to the graphs.

You may also want to view another tutorial on graphs and sliders.

1 7 8 9 10 11