Investigating Polyhedrons with Poly

Poly is a program for investigating polyhedral shapes. Poly can display polyhedral shapes in three main ways:

  • as a three-dimensional image,
  • as a flattened, two-dimensional net, and
  • as a topological embedding in the plane

The three-dimensional images may be interactively rotated and folded/unfolded. Physical models may be produced by printing out the flattened two-dimensional net, cutting around its perimeter, folding along the edges, and finally taping together neighboring faces.

Using Poly is fairly intuitive, so there is no need to post a tutorial about it. You can download Poly here.

Note: The text above was copied from the Poly readme file.

Area Tutorial 5 – Area of a Trapezoid

In this tutorial, we are going to derive the area of a trapezoid. A trapezoid (sometimes called a trapezium) is a quadrilateral with exactly one pair of parallel sides. Trapezoid PQRS is shown below, with PQ parallel to RS.  We have learned that the area A of the trapezoid with bases b_1 and b_2 and altitude h is given by the formula A_{PQRS} = \displaystyle\frac{(b_1 + b_2)h}{2}.

Figure 1 - Trapezoid PQRS with PQ parallel to RS.

We are going to derive the area of a trapezoid in two ways: First by dividing into different sections and second by rotation.

Derivation 1: Area by Dividing into Regions

If we drop another line from Q, then we will have two altitudes namely PT and QU, which both have length h units.

Figure 2 - Trapezoid PQRS divided into two triangles and a rectangle.

From Figure 2, it is clear that Area of PQRS = Area of PST + Area of PQUT + Area of QRU. We have learned that the area of a triangle is the product of its base and altitude divided by 2, and the area of a rectangle is the product of its length and width. Hence, we can easily compute the area of PQRS. It is clear that A_{PQRS} = (ah/2) + b_1h + (ch/2).  Simplifying, we have  A = \displaystyle\frac{ah + 2b_1 + ch}{2}
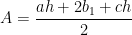
. Factoring we have, A_{PQRS} = (a + 2b_1 + c) \frac{h}{2} = [(a + b_1 + c) + b_1] \frac{h}{2}. But, a + b_1 + c is equal to b_2, the longer base of our trapezoid. Hence, A_{PQRS}= (b_1 + b_2) \frac{h}{2}.

Derivation 2: By Rotation

In the second derivation, we are going to duplicate the trapezoid and rotate it as shown below. It is evident that quadrilateral PS’P’S is a parallelogram (Why?). But we have learned that the area of the parallelogram is the product of its height and its base. Hence, A_{PS'P'S} = (b_1 + b_2)h.

Figure 3 - PQRS translated and rotated to form a parallelogram.

But the area of the trapezoid PQRS is half of the area of the parallelogram PS’P’S. Thus, A_{PQRS} = \displaystyle\frac{(b_1 + b_2)h}{2}.

Enjoy and Learn More

GeoGebra Tutorial 9 – Vector and Translation

This is the ninth tutorial in the GeoGebra Intermediate Tutorial Series. If this is your first time to use GeoGebra, you might want to read the GeoGebra Essentials Series.

In this tutorial, we use the Vector between Two Points tool to translate a triangle and investigate the relationship between its preimage and image. We will also use the grid in this tutorial.

If you want to follow this tutorial step-by-step, you may open the GeoGebra window in your browser by clicking here.

1.) Open GeoGebra and select the Algebra & Graphics view from the Perspectives menu.
2.) Display the grid by clicking the View menu and choosing Grid.

GeoGebra-grid

3.) Click the New Point tool and place the points on the coordinates given: A on (2,3), B on (4,1) and C on (5,2).
4.) Next, we draw triangle ABC using the Polygon tool. To do this, click the Polygon tool and click the points in the following order: point A, point B, point C and point A again to close the polygon.
5.) To display the label and the coordinates of the points, right click the points then click Object Properties to display the Preferences dialog box.
6.) In the Basic tab of the Preferences dialog box, check the Show label check box, and choose the Name & Value option in the drop-down list box, and then close the window. Your drawing should look like the figure below.

Figure 1

7.) The only remaining part of the construction is the vector tool. To construct vector DE, select the Vector between Two Points tool, click the origin and click the coordinate (1,2). After this step, your drawing should look like the one shown in Figure 2.

Figure 2

8.) To translate the object using the vector, select the Translate Object by Vector tool, click the triangle and then click the vector. Notice that a translated triangle appears after clicking the vector tool.
9.) What can you say about the preimage of the triangle object and the translated object?
10.) If the coordinates of the vertices of the translated triangle is not displayed, display it using the steps we have done in step 5 and 6.
11.) What do you observe about the relationship of the coordinates of the points of the original triangle and the translated triangle?
12. Move the terminal point (point E) of the vector. Does your observation in (11) still hold?
1 15 16 17 18 19 23